Friday, June 3, 2011

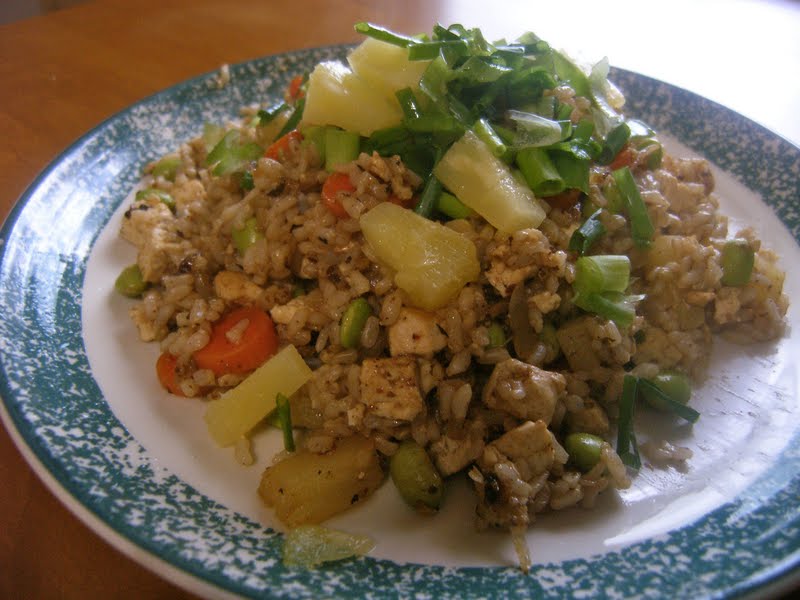
Pineapple Fried Rice

What could be more Hawaiian than pineapple? To learn about the history of pineapple in Hawaii, visit the Dole website, they explain it better than I can. FYI,  the maze at the plantation on Oahu is hard.

Pineapple is very sweet and juicy. I have to admit that I don't like them on their own, too sweet for my taste. But I love them for cooking and baking because they pretty much eliminate the need for any additional sweeteners.

They have been used as an anti-inflammatory since ancient times and have lot of vitamin C. They are also a great source of manganese and thiamin. It also has an enzyme that aids digestion so it is good after a heavy meal.

However, this fried rice dish isn't heavy at all. It is a nice balance between sweet and savory. I used canned pineapples because I hate peeling and coring whole ones. When buying canned fruit, make sure it is stored in 100% juice, not syrup. No one needs extra sugar water. I also used edamame (whole soy beans) instead of peas because it gives it more texture.


Pineapple Fried Rice
2 cups cooked brown rice
Sesame oil 
1/2 block of firm tofu, drained
1/2 cup onion
1 clove garlic
1/4 inch of fresh ginger
2 medium carrots
1/2 cup edamame, shelled
1/2 cup pineapple, canned or fresh 
4 tbs soy sauce
2 tps rice wine vinegar
1 tps red pepper flakes
Green onion, chopped, for garnish


Everyone has their own technique for making rice, so make it the way you like and set aside to cool. It will "fry" easier when cooled.

Finely chop the onion, garlic and ginger. Next chop the tofu, carrots, and pineapple into bite-size pieces.

In a large skillet over medium heat, heat the sesame oil. Add the tofu and cook until the outside is slightly golden. Then remove from the skillet.

If needed, add a bit more oil to the pan. Add the onion, garlic, and ginger and cook until the onions are slightly golden.

Next add the carrots, cook until tender.

Add the rice, cooked tofu, edamame, and pineapple. Mix together well.

In a small bowl, mix together the soy sauce, vinegar, and red pepper flakes. Add to the skillet and mix in well.

Press into a flat layer and let it cook for a few minutes. Break it up, press it flat again, and cook for another few minutes. Repeat until it reaches desired level of "fried." 


Sprinkle with the green onion before serving and enjoy a sweet taste of Hawaii!

Wednesday, June 1, 2011

Purple Sweet Potato Salad

I realized I live in Hawaii but haven't made any Hawaiian food yet! So the next few posts will be devoted to Hawaiian dishes. 

I knew sweet potatoes came in other colors, but I have only seen orange on the mainland. The first time I went to the Hilo Farmers Market, a lady was selling a bag marked "potatoes" for $2. I thought awesome! Cheap fresh little finger potatoes. When I cut into at home, I was surprised that they were purple inside.  I asked my roommate at the time, who was from Maui, and she looked at me like I was crazy. "They are sweet potatoes...You know like Thanksgiving casserole?" 

Purple sweet potatoes, or ‘uala,  are a member of the morning glory family and are native to Japan.  Japanese immigrants brought them to Polynesia more than a century ago. However, it is believed that the Polynesians brought some form of sweet potatoes with them on their travels throughout the Pacific prior to the Japanese introduction. All sweet potatoes are loaded with antioxidants and have anti-inflammatory properties. They also have tons of fiber and vitamin A.

Although common to Hawaiians, they were totally strange to me. I love them now though. Not only are they my favorite color, but they are also delicious. They aren't quite as sweet a the orange or yellow ones, and bit more starchy. They are great for fries or chips, but I love them in curries.

I decided to make a healthier version of a very common side dish in Hawaii: potato salad. Potato salad and macaroni salad are  are always part of the classic Hawaiian plate lunches. But, they are loaded with fat and calories, and I have yet to find a plate lunch place that has a vegan version. For this recipe, so no one can argue I took the Hawaiian-ness out of the salad, I used as many local products as I could. Local organic purple sweet potatoes, and carrots, plus Sweet Maui onions, and Maui Sweet Onion dressing from Rainbow of Tastes.


This recipe calls for some very specific ingredients and if you can get them, great! If not, you can always adapt the recipe to what you can get. However, I would not recommended using regular orange sweet potatoes in this recipe. Like I said, purples are starchier and sturdier, more like a real potatoes than creamy orange sweets. If you cannot get purples, just use regular potatoes.


Purple Sweet Potato Salad
8-10 small purple sweet potatoes, peeled and chop into chunks
2 medium carrots, diced
2 stalks of celery, diced
1/4 Sweet Maui Onion, diced finely
2 tbs sweet pickle relish
1/2  to 1 cup  Maui Sweet Onion by Rainbow of Tastes
Salt and pepper, to taste


Fill a pot 2/3 of the way with cold water.

They aren't solid purple, more like marbled.
Rinse, peel, and chop the sweet potatoes into chunks. Put in the pot and bring to boil over medium-high heat.

 You can shred the carrots if you like too.


While the potatoes cook, dice the carrots, celery, and onions.


Still purple when cooked.
Once the potatoes are soft enough for a fork to be inserted with little resistance, remove from the heat and drain. You do not want them totally smushy like for mashed potatoes, but soft enough to eat and still remain in chunks. Do not rinse, it will make them smushy. Let them cool for a few minutes. The potatoes will absorb more flavor while warm, so don't let them cool entirely before dressing. 


I should have got a bigger bowl...
In a large bowl, add the potatoes, diced veggies, relish, and dressing. I recommend putting the dressing in a little at a time so you don't over do it. It takes a minute for it to absorb. Mix it all together, seasoning with salt and pepper to taste. Try not to mash up the potatoes too much.


Cover and let it chill in the fridge for at least 2 hours.
 I love the colors, and the sweet onion dressing is the perfect compliment to the sweet potatoes.

Wednesday, May 25, 2011

Humintas: Bolivian Tamales


After receiving my package from Bolivia, I researched Bolivian food.  While majority of it isn't vegan, because it uses fresh ingredients and simple cooking methods, it can easily be adapted. After looking at many mouth watering recipes, I saw humintas and knew I had to make them. They are pretty much just the Bolivian version of a tamale. I had a hard time fiding a basic recipe online, so I based this one on several. I also used followed some advice my friend Leslie gave me.

Although they are not complicated to make, they are time consuming (especially if you have to ground your corn by hand because your blend broke like me). But, I promise they are worth it.

I made a green chili and cilantro sauce to go with them. It's a perfect compliment for the slightly sweet corn, and it's not overly hot so don't be afraid. 


Green Pepper and Cilantro Sauce
1 cup cilantro
1/2 cup green onion
2 hot peppers
1/2 cup water
Pinch of salt
Red pepper flakes


If you have a blender or food processors, just throw everything in there and blend until your desired consistency.

Fresh from Farmers Market.
If you have a broken blender like me, finely chop the cilantro and green onions.

I really wished I had my blender to do this


Chop the peppers in half and remove the stem, membranes and seeds. I left a few seeds since I like it hot. Then chop finely.

Add the cilantro, green onions, and peppers to a small bowl. Add all the remaining ingredients. Mix together well, then let it sit in the refrigerator for a few hours to let the flavors develop.


Humintas
3 cobs of corn, with husks still attached 
1/2 corn meal
4 tbs Engr-G egg replacer
1 tomato
1/4 cup vegan cheese (I used Daiya mozzarella)
Pinch of salt and pepper


Pre-heat the oven to 375 degrees Fahrenheit. 


Only use fresh corn, canned will not work.
Carefully remove the cobs from the husks. Don't rip or tear them, they are what you cook the corn filling in.  Remove the silk and rise clean.


Watch it, the kernels like to fly off.


Next cut the kernels off the cobs. This can get a bit messy so I suggest  doing this in a bowl so the kernels don't end up everywhere.


Mashing by hand sucks.
Now, put the kernels in the blender with the corn meal and blend into a slightly sticky paste. I unfortunately had to ground mine by hand (the nice thing about being a geologist is I usually have a nice piece of rock laying around that can be used as a pestle. And yes mom, it's clean!).


Next, remove the seeds from the tomato and chopped finely. Add to the corn mixture.

Traditionally the humintas are stuffed with the cheese, but I am not that talented yet. Add the cheese and egg replacer, then season with the salt and pepper. Mix together well.


Bring a few inches of water to boil in a large pot on the stove.

In another pot, put a few inches of cold water and set aside.

Sort the corns husks into large and small pieces. The large ones are will be the wrappers and the small ones will be used to tie the humintas shut.

Once it's boiling, place the large husks into the boiling water for about 10 seconds. This makes the husks easier to work with.Then dunk straight into the cold water.

Spray a pan or cookie sheet with cooking spray. 


Now time to fill the husks. Spread enough of the corn mixture, 2-3 tablespoons depending on size of the husks, into each husk in a thin layer. I  suggest laying several husk on top  of each other, it is easier to fill and tie. I also suggest oiling the inside husk before you put in the filling. I didn't do this and my huminitas stuck a little bit.

Not the easier thing to do, but it gets better with practice.
Now fold over the sides to make a little package. Then tie shut with the smaller husks like string.

Not the best wrapping job ever....


Place the humintas on the pan or cookie sheet and bake for 30-40 minutes. They are done when the husks are browned and steam is no longer coming off them.


I thought they might open, but I didn't have any more husks.

Mine burst open because I didn't wrap them tight enough. I should have used more husks and tied them better. They still tasted amazing, and the few that did stay closed were the best ones.


I topped them with sauce and ate them while they were still hot. Since most of mine stuck to the husks, I had to scoop them out. But normally, they should come right out and be eaten freely. Sweet, cheesy, and very filling.  The sauce provided a nice contrast. I can't wait to have authentic ones, let's hope I get to go to Bolivia soon!
Viva las humintas!


The recipes I based this on:
http://www.food2.com/blog/humitas-ecuatorianas
http://www.epicurious.com/recipes/food/views/Andean-Humita-en-Chala-230683
http://thefrugalchef.com/2009/10/humintas-bolivian-style-tamales/
http://www.boliviaweb.com/recipes/english/humintas.htm
Tuesday, May 24, 2011

From Bolivia, with Love.

I have the coolest friends ever. Leslie, who I have mentioned twice before, showed her madre my quinoa post and she decided to send me Bolivian treats. The package came yesterday morning, I was very excited when the office called me to say it arrived.
Lovely whole grain treats and a fun post card.

First of all, there was a lovely post card with a picture of hot air balloons and a nice message on the back. It made me smile :-) She also sent these little grain bars. Some are quinoa, some amaranth, and some canahua. I tried one of each, they were all delicious. They aren't sweet or salty like most American-made granola or cereal bars. Since there are no fancy ingredients like high fructose corn syrup or chocolate, the grain flavor really stands out (proving the point that when you use quality ingredients, you don't need to add all that other stuff). The amaranth is my favorite, it kind of has a nutty flavor.
Loved them all, but the amaranth is my fave.

The other item in the package was popped quinoa, which I've never had before. I've had "puffed" rice (aka Rice Crispies) and seen other puffed grains in the health food store, but I have never tried them before. They look like Rice Crispies, just rounder. I must confess, they look yummy but I am not sure what to do with them. The most obvious answer is quinoa crispy treats, but I feel like its a tragedy Americanize a lovely Bolivian gift. Despite the writing being in Spanish, the ingredients in the recipe on the back were straightforward enough I could figure out what it says. It suggests making like a quinoa yogurt parfait with fruit, which does sound good but I am not sold on the idea yet. I started researching recipes for how to use it, but ended up getting side track with Bolivian recipes.  So, look out for an upcoming Bolivian food post with popped quinoa in it somewhere.


Not sure how to use it yet, but can't wait to try it.
Thank you so much Beatriz for my package! I really want to come visit now. Leslie sent me a post card last time she was there, it has gorgeous mountains and cute fuzzy llamas on it. I hanged it over my desk as inspiration to graduate so I can come see Illimani for myself. I'm going to look for Hawaiian things to send you both too.

Monday, May 23, 2011

Peaches and Cream Oatmeal

Most mornings I eat oatmeal for breakfast. It's cheap, filling, and very good for you. Want to know why doctors recommend it for people with high cholesterol? Pour some dry oatmeal into a cup then pour some oil on top. The oats will suck the oil right up. That is essentially what it does to the fat in your blood. I'll post a few links at the bottom that will explain more.

I had some canned peaches in the cupboard so I thought some peaches and cream oatmeal would be a nice way to kick off my Monday. Obviously being vegan I don't use real cream, but I use something even better: chilled coconut milk. When you chill coconut milk it thickens into a cream. However, it thins out again when it warms up, but it will last long enough for you to eat it. It's really easy to do, just stick a can of coconut milk in the fridge for at least an hour. Open it up and there you go, a can of coconut cream.

This is one of my favorite breakfasts. The peaches and shredded coconuts are sweet enough that you don't need to add any extra sugar. This recipe makes one serving, but can be easily multiplied for more.


\
Peaches and Cream Oatmeal
1/2 cup old fashioned oats
1 cup water
1/2 cup peaches, canned or fresh, drained and cut into slices
1 scoop (mine was pretty generous) chilled coconut milk
1 tbs shredded coconut


Add the oatmeal and water together in a small bowl. Microwave for two minutes, or according to the package directions. It should be completely cooked.

Add the peaches, then top with coconut milk, and sprinkle on the shredded coconut.

Stir together and enjoy!
 
Here a few links that explain more:
http://www.webmd.com/cholesterol-management/features/the-new-cholesterol-diet-oatmeal-oat-bran
http://www.mayoclinic.com/health/cholesterol/CL00002

Sunday, May 22, 2011

Cheesy Fried Tofu

Oh my God. This is one of the best things I've ever made. I had Daiya cheddar left from my Mexican Pizza, and couldn't face another burrito (I've been eating them all week for lunch). I already planned on making collard-green-style Swiss chard, so that lead me to thinking about my Southern dinner the other night. Then it hit me, cheesy fried tofu. I couldn't find a recipe for it online so I decided to just add cheese to my fried tofu batter. This recipe is for one serving, but is so simple it can easily be multiplied to feed more people.

Tastes better than chicken.
Cheesy Fried Tofu
1 block extra firm tofu
2 tbs soy sauce
2 tbs flour 
Pinch of salt and pepper
1/4 cup+2tbs flour, (I used rice, but any kind is fine)
1/2 cup soy milk, unflavored 
1 tbs nutritional yeast
1/2 tbs soy sauce
1 tps yellow mustard
3-5 shakes of Tabasco sauce 
1 tps garlic salt
Pinch of pepper
1/4 cup vegan cheddar cheese (try Daiya) 
Oil for frying

Drain the tofu.

Place several sheets of paper towels on a flat, clean surface. Put the tofu on the paper towels, then place some more paper towels on top. Now get something heavy (I use my science textbooks, my mom uses stone bookends) and place it on top. This will squeeze out all the liquid so it will get a denser texture when cooked. Leave this for at least an hour, but the longer the better.

Next, place the tofu in a freezable container and freeze over night.

Drained, frozen, thawed, and marinated.
The next morning, place it on the counter to thaw.

Once fairly thawed, sliced in half lengthwise so it's like 1/4 inch thick steak. I normally don't like to cut tofu into steaks, but I figured the cheese would stick better to a bigger piece. Since I am only cooking for me, I put one half back in the fridge for another day. Pour the 2tbs of soy sauce over both sides and let it marinade for at least a half an hour.


Cheesy.
In a small bowl, mix together the 2 tbs of flour with the salt and pepper.

In another bowl,  mix together the remaining ingredients. It should make a chunky batter.

Heat the oil in a skillet over medium-high heat. The oil is ready when some water sprinkled in sizzles and bounces right out.

I don't know why the batter looks more yellow in this one...
Now time to fry. First, coat both sides of the tofu steak in the dry flour mixture.

Pile it on, get a nice thick crust.
Next dip it into the cheese mixture. Make sure it is thoroughly coated in a thick layer.

I had some butter in the pan too, that's why the oil is a bit brown.
Next place in the hot oil. Cooked on both sides until golden brown and crispy.


I was so eager to try the tofu, I almost forgot to take final pictures! It was crispy and gooey, just like I imagined. I loved it with spicy Southern-style Swiss chard. Best fried tofu ever.

I hurried through the photos because I wanted to try it so bad!