Thursday, October 31, 2013

Roasted Chickpeas


Being pregnant does not mean eating for two. And it is not an excuse to eat whatever you want. In reality, for a healthy single pregnancy, you do not need any extra calories the first trimester. The second about 300 more. And the third about 500 more. 

So being 16 weeks, I need an extra 300 calories a day right now. This equates one extra snack.  I was having a glass of soy milk and a piece of fruit, but I was getting bored with that everyday. I wanted something crunchy and salty---like potato chips, but not as much fat. Plus I wanted more protein. Then I saw something on Pinterest about roasted chickpeas and knew I had to make them. I decided to just make up my own version to suit my taste. So feel free to change the spices to suit your tastes!

This recipe makes about 15 servings.

Roasted Chickpeas
1 bag of dry chickpeas
Water
4 tbs Olive Oil
Salt
Smoked Paprika 


In a large bowl, add the dry chickpeas and cover with water. 

Let for at least 6 hours, overnight is possible. Side note, the chickpeas making a popping noise as soak up the water. Took an hour for my husband and I to figure out where the noise was coming from...

Drain the chickpeas. 

Pre-heat the oven to 400 degrees.

Coat with the olive oil, salt, and smoked paprika. 

Spread onto a baking sheet in a single layer.

Baked for one hour. Give them a stir or shake occasionally. 

Let them cool and enjoy! 


These are even better than I hoped! I am one happy expecting mama!


Apple Walnut Salad with Tofu


Part of my prenatal care includes a nutritionist, which I think all prenatal programs should have. An expert separate from your OB/GYN that just focuses on how you are eating and proper weight gain. As knowledgeable and beneficial my nutritionist is, I am kind of annoyed with her. I told her I was vegan---no animal products, honey, or eggs. Then we went over my diet. She said it was one of the healthiest she has seen in awhile. Then she went over my blood work. Again, is was amazing. And she had no complaints about my weight gain so far. Then she hits me, "I am sorry, but legally I need to classify you as nutritionally high risk."

WHAT? High risk nutritionally? Because I chose to break from the standard American diet and not to eat meat loaded with fat and antibiotics? Or dairy loaded with hormones?

Then she reassured me that I am healthy and the baby is healthy, so all that matters. It's just a legal term. Her only suggestion was I eat one more serving of leafy greens every day. So I have made this giant, veggie-packed salad for lunch most days now.

And yes, this salad has plain tofu. If you do not like the taste of plain tofu (I actually do), you can marinade and cooked it first. But honestly, with all the dressing and veggies, you don't even notice the tofu.


Apple Walnut Salad with Tofu
3 cups leafy greens (any combination of dark lettuce, spinach, kale, arugula, etc.), washed and dried
1/4 cup carrots, chopped or shredded
1 Fuji apple, chopped
1/4 small red onion, chopped
1/4 cup raw walnuts, chopped
3 oz extra firm tofu,  drained and cubed
2 tbs Annie's Lite Goddess Dressing
Cracked black pepper, to taste


In a big bowl, mix together all the ingredients. It's that easy!

You can use any dressing you like, but Lite Goddess is amazing! This is just not for pregnancy, but make a great lunch for everybody. The nutrients of the dark green vegetables, vitamin C from the apples, vitamin A in the carrots, and healthy fat from the walnuts. I even suggest throwing in some avocado chunks too. High risk pregnancy my ass...


Friday, October 25, 2013

Pasta with Butternut Squash Sauce


In last post, I mentioned that I also got a butternut squash at the pumpkin patch. I bought it randomly without a recipe in mind. Thursday morning I woke up and thought pasta with creamy butternut squash sauce would be amazing for dinner. Then my best friend (the maker of the amazing reception cake) and her boyfriend wanted to come over to carve pumpkins. So I decided to make a nice dinner for everyone.

This is recipe is similar to most other squash sauce recipes out there (except that it's vegan), but it not based on any particular one. I just put in what I thought sounded good.

This recipe makes 6 servings.

Pasta with Butternut Squash Sauce
1 large butternut squash
1 tbs vegan butter (I used Earth Balance), divided
1/2 cup onion, chopped
1 clove of garlic
1 tps cinnamon
1/2 tps chili powder
1/2 tps smoked paprika
3 cups plain soy milk
1 cup low sodium vegetable broth
6 servings of any kind of pasta (I used strozzapreti)
Basil, to garnish


Pre-heat the oven to 400.

Cut the squash in half. Scoop out the seeds and membrane, and discard them,

Rub 1/2 tbs of the butter on the inside of both halves.

Roast in the oven until the squash is soft, like when a knife can be inserted without any resistance. This takes about 25-30 minutes.

Set the squash aside to cool.

Meanwhile, sautee the chopped onion in the remaining 1/2 tbs butter. Once soft and translucent, add the garlic. Cook for just a minute.

Now add the cinnamon, chili powder, and smoked paprika. Cook another minute.

Add the soy milk and veggie broth. Stir well.

Now, scoop out all the meat from the cooled squash. It should be soft, like mashed potatoes.

Mix and mash together the squash with the liquid. It's okay if it is still a little lumpy.

Turn off the heat and let the flavors meld.

Cook your pasta according to the directions on the package.

Then add the pasta directly into the sauce.

Season with salt and pepper to taste.

Garnish with some fresh basil and serve.


We paired it with a nice salad and some bread, and it was a lovely meal indeed. Amanda said she could not believe how flavorful it was. Michael said the sauce tasted like Fall. I would just eat the sauce by itself honestly. With flavor like this---plus all fiber, vitamin C, and vitamin A---there is no reason not to make this lovely Fall dish!


Wednesday, October 23, 2013

Thai Pumpkin Curry


I have professed my love for Fall and pumpkins before (check out my pumpkin carving and Pumpkin Waffles posts).  This past weekend Michael and I went back to the Half Moon Bay area to pick pumpkins. We decided to skip the Pumpkin Festival and all the traffic/chaos this year.


We went Arata's Pumpkin patch, a cute little place just south of Half Moon Bay on Highway 1. It was pretty busy, but not as crowded as the Pumpkin Festival would have been. We picked our pumpkins and smiled at all the cute babies running in the patch and climbing the hay bails. It got us excited to take our little pumpkin next year.

The bump has started to appear

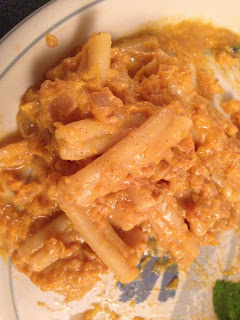
We each got a pumpkin to carve. Plus, we bought an extra little pumpkin and butternut squash to cook with later. I am not sure what to do with the butternut yet, but I knew the little pumpkin was destined for Thai curry. Roasted pumpkin adds another layer of flavor to a creamy and spicy curry. This is variation of my Yellow Vegetable Curry, trying to make it more authentic tasting.  I decided to make it in the crockpot so it could have plenty of time for all the flavors to mend.

This recipe makes 4 servings.

Thai Pumpkin Curry
1 small pumpkin
1/2 tbs coconut oil
1 small white onion, chopped
1 half inch piece of ginger, peeled and minced
2 cloves of garlic
1 eggplant, chopped
1 yellow bell pepper, chopped
1 bunch of broccolini (normal broccoli is fine), cut into half inch pieces
1 large carrot (or 15 baby carrots), chopped
1/2 cup snap peas
1 can of coconut milk
4 cups water
1 tbs soy sauce
1 tbs curry powder
1 tsp turmeric
1 tbs Sriracha
1/2 tbs tamarind chutney (or paste)
Zest of one lime
Juice of one lime
1 bundle of lemongrass
3 cardamom pods
10 large basil leaves, chopped
6 mint leaves, chopped
Salt and pepper, to taste


Pre-heat the oven to 375 degrees.

Carefully cut the crown off the top of your pumpkin (see my pumpkin carving post for more details).

Now carefully cut the pumpkin in half.

Scoop out all the seeds and membranes.

Lightly spray the insides of the pumpkin halves with cooking spray.

Place skin side down into a baking sheet. Bake for 35-40 minutes, until soft and tender.

Set aside to cool.

Once cool, remove the meat from the skin (I suggest a small knife and just cut away the skin and rind).

Cut it into cubes.

Plug in your crockpot and set to low.

Add the coconut oil.

Once it is melted, add the onions, garlic, ginger. Let is cook for a minute.

Add the chopped eggplant, bell pepper, broccilini, carrots, and snap peas.

Pour in the coconut milk and water. Mix well.

Add all remaining ingredients, except the salt and pepper. Mix well.

Cover and cook until the veggies are soft, about 2 hours. You may need to adjust temperature and time for your crockpot.

Serve over jasmine rice. Garnish with basil, mint, and/or cilantro.


Tons of vitamins and flavor! I lovely fall dish.


Monday, October 14, 2013

Green Chili Stew

I fell asleep on the couch last week (one of the joys of being pregnant) while watching Food Network. As I started to wake up, I heard something about roasting hatch chilies for green chili strew. By the time I actually woke up, the show was over so I have no idea what it was or who was making. It still sounded good so I decided to make it for dinner.

This stew came out FANTASTIC. When Michael walked in the door he said it smelled like his grandma was cooking (he is half Hispanic, his grandparents were of Spanish decent born in New Mexico).  He is not a big soup or stew fan, but he asked for a second bowl!

Sadly, I don't have hatch chilies right now. And, I did not feel like going to the store to by anaheims or some other chili. So I just used the jalapenos already in my fridge. It still came out AMAZING, but would be even better with hatches if you can get them.

This recipe makes 4 servings.

Green Chili Stew
6 jalapenos
3 tbs olive oil
1 block of extra firm tofu, cubed
1/2 red onion, chopped
1 large carrots, chopped
1 clove garlic, minced
2 tbs flour
4 cups water (or vegetable broth)
1 large tomato, diced
Salt and pepper, to taste
Cilantro, for garnish


Roast the whole jalapenos. I did this over my gas stove burner. You can also do it in the broiler or over a grill. You want a nice black char on the skins.

Pop the roasted peppers into a zip lock bag and let them cool. The steam will loosen the skins. Once cooled, remove the charred skins and the stems.

Chop the jalapenos.

In a large pot over medium heat, add the olive oil.

Lightly brown the tofu.

Add the chopped onions and carrots, saute until they start to soften.

Add the garlic and cook saute for a minute.

Add the flour and coat the veggies well.

Add the water and mix together well. Break up all the flour clumps.

Stir in the chopped jalapenos.

Turn the heat down the low and let the broth thicken slightly, about 10-15 minutes.

Season with salt and pepper to taste.

Removed from the heat and add the diced tomatoes.

Garnish with a little cilantro and serve.


A warm tortilla on the side and you have a very tasty dinner!

Thursday, October 10, 2013

Kava Kava

Source
Michael is half Fijian-Indian. His dad was born and raised in Fiji. Wanting to explore his islander roots was one of the reasons he went to UH Hilo (and met me!). So for our wedding reception luau, Michael requested I make a popular Fijian drink, kava. I wanted to make him happy, so I said yes...but being a little Polish white girl, I knew nothing about it. I had before in Hawaii, but I had no idea how to make it. So I did some research.

Kava is made from the ground up root powder of Pacific pepper trees and water. It is a social drink, normally drank with good company to create good memories. It is especially popular among young men, as a way to bond. It is notorious for sedative and slight hallucinogen qualities. It is not like you are gonna have an acid trip, but you will definitely feel more relaxed and open.    

Then Michael sent me to a Kumar's Island Market, a Polynesian store in San Jose. It was small, rundown looking building. It reminded me of almost every building in Hawaii, so I loved it. The store is really small, but if you want anything from the islands, this is the place. The guy was really nice and got me enough kava powder for the party.

Then I still have the problem of making it...and Michael had no idea because his dad never really taught him how. "It's like making tea," was my only clue from him. So I turned to YouTube! I found tons of videos on how to make it. This is video I based my recipe on:


This recipe makes 2 gallons, enough for 30 people.

Kava Kava
2 gallons of purified water
1/2 lbs kava root
1 large mesh or nylon strainer bag

Bring all the water to boil. Turn off the heat.

Add the kava to the strainer bag. Do not tie the end yet.

Dip the strainer back into the water while still holding the open end (do not let go yet). Spoon some of the water into the bag to ensure all the powder gets wet.

Now tie the end of the bag and let it float. Cover with a lid and let it steep for 15 minutes.

Remove the lid and let it cool a bit.

Once it is cool enough, start ringing out the strainer bag into the pot. Once it dries out, dip in the water and ringing it out again. Repeat this 3-5 times.

At this point, I got Michael and had him taste it (did not think drinking a sedative was a good idea while pregnant). He said it was great so I served it. Traditionally kava is drank from coconut shells. We only had 6 of them, thinking everyone would not want to try it at once. We were wrong. All our guests wanted to do a big toast at the same time, so we had to pass out plastic cups.

Source
Everyone said the minute it hit their lips, their whole mouth went numb. And it continued to numb all the way down. Most were good with just one cup, but quite a few came back for more. I will have to wait until after the baby is born to try my version of kava. Good thing we still have half a pound of kava powder left! When I tried it in Hawaii, I remember thinking I needed to become one with my chair or else both of us would cease to exist...fun times :-)

Kava is truly unique experience, highly suggest you try. Make a bowl and share with your loved ones.

BULA!


Wednesday, October 9, 2013

Huli Huli Seitan

Source
So....I was so busy and excited during my wedding luau that I forgot to take pictures of food....bad food blogger...

I made Huli Huli Chicken for the meat eaters and Huli Huli Seitan for the vegetarians. I chose Huli Huli because I wanted to give our guests something unique to Hawaii. And it's easay.

Hul Huli "Chicken"

But I have made Huli Huli "Chicken" and seitan before on this blog. So I essentially combined the two for this recipe. It looks almost exactly like Seitan Ribs, just more sauce and in cutlets.

Seitan ribs

I put the seitan out during the party and just told the vegetarians what it was. Everyone else started eating it too. Some thought the texture was different, but my answer to that is "duh". I've said this before, nothing will ever taste and feel exactly like meat, except meat! But everyone still ate it, despite their comments. So it must be pretty good :-)

This recipe makes 20 servings. It can easily be cut down for a smaller crowd, but seitan keeps well in the fridge and freezer too.

Huli Huli Seitan
1 carton of vegetable broth
1 package Bob's Red Mill Vital Wheat Gluten
2 and 2/3 cups water
1/4 cup soy sauce
3 gloves of garlic, minced
2 and 1/2 cups of ketchup
1 cup brown sugar
1 and 1/4 cup white wine vinegar
4 cloves minced garlic

In a large pot, add the carton of veggie broth and fill the pot up to 3/4 of the way full with water. Bring to a boil.

Meanwhile, in a large bowl add the vita wheat gluten, water, soy sauce and 3 cloves of minced garlic. Mix together until it forms a smooth and elastic dough. If you like, you can knead it together when it starts to get thicker.

Once the dough is ready,  divide into 20 smaller balls. Shape the balls into little cutlets. The dough is elastic so this might take awhile, you can let it rest if need be too.

Now drop the cutlets into boiling water and cook for 1 hour. They will puff up so give them a stir to resubmerge them occasionally.

Remove them from the pot and place in a large Tupperware container.

In a small bowl, combine all the remaining ingredients to make the sauce. Pour over the seitan, coating it well.

Seal up the container and  let it marinate in the fridge for at least 2 hours.

Now you can finish cooking it any way you want. I suggest throwing them on the grill until they get some nice grill lines. Or under the broiler just until they start to blacken. Or pan fry until nice and golden.

A lovely chicken substitute to remind you of the islands.

Tuesday, October 8, 2013

Wedding Reception and Wholesome Chow Cake

In my last post I talked about our wedding. The only guests were my parents and Michael's Aunt and Uncle---only because I just wanted something simple.  However, the following Saturday we had a luau party at our home. It was a lot of fun and it wonderful to celebrate with the rest of our friends and family. I will post recipes from the BBQ in the next post.

For this post, I will talk about the amazing cake my best friend Amanda made for me (she may be the antagonist of the sushi post story...). Since I usurped her of maid of honor duties by running off to Vegas, I asked if she would make a small cake for Michael and I to cut at the Luau. And of course I requested it be vegan.

She worked at a bakery before, but is not too familiar was vegan baking. So she turned to mix---but not just any mix. Like me, she does not believe in all artificial junk and chemicals that come in most processed foods. She used Wholesome Chow, a certified organic and non-GMO company. It specializes in gluten-free, vegan, and allergen-free baking mixes.
Source
Amanda made a two-layer round cake, using the Organic Vanilla Cake Mix and Organic Chocolate Cake Mix (each layer was a different flavor). She added soy milk and Earth Balance Original Buttery Spread.

Source
The mixes came out well, but did not rise as much as she hoped. I forgot to tell her that vegan cakes never will rise as much as traditional cakes. I should have told her to use the Earth Balance Baking Buttery Sticks and to whip more air in than normal (without over mixing the batter), makes the cake a little more fluffy.
Source
She frosted with the Organic Vanilla Frosting Mix, once again adding Earth Balance. Then she decorated with brown sugar to make it look like sand and used our kissing Hawaiian salt and pepper shakers as the cake toppers.


IT WAS SO CUTE!!! You did an amazing job Amanda and I am very thankful to have you in my life (and not just for your baking skills).


By the way, this cake is even better when you get to shove it in your husband's face! Hahaha...

I am going to try other products from Wholesome Chow now....thinking maybe the Organic Chocolate Lavender Cake Mix would be cute for a baby shower and some Organic Hi-Protein Pancake Mix would be great after a morning hike.


Saturday, October 5, 2013

Vegas Wedding and Dinner at Scarpetta


So,  we got married in Las Vegas!

Source

I chose the Las Vegas Wedding because I liked their packages and options. I wanted something easy, quick, and simple. I wanted our love to be focus the ceremony. I honestly have no complaints with this chapel at all. I would like to warn this is quick, in-and-out, no frills place. If you want the long, elaborate, personalized ceremony then this place is not for you. Our ceremony was still beautiful and we got great customer service nonetheless.


Afterwards my dad took amazing photos of us on the strip.


It was SO much fun! Everyone was saying congrats and giving us high fives.


But seriously, look at  how great these photos are? My dad is very talented. Thank you so much Papa!

 
Then we had dinner at Scarpetta in the Cosmopolitan. We had a table with an amazing view of the Bellagio fountains.  The service and the food were AMAZING! 


To start, I got the Heirloom Tomato Salad. Fresh heirloom tomatoes, olives, marinated eggplant and good olive oil. Michael just ate the cheese for me. Then I had the Spaghetti, which was seriously the best pasta I have ever had. Homemade pasta with simple red sauce with tons of fresh basil.


Then for dessert Michael and I shared Amedei Chocolate Cake (it was not vegan, but like I have said before, you have to be reasonable sometimes). Not only was it so delicious I cannot even think of a word to describe it, they wrote "Congratulations" on our plate!


I seriously recommend this place to everybody. We are going to come back  to Vegas for our anniversary next year, and I already know I want to eat here again. Check out the rest of the menu here.

Thank you Mom and Dad for making your princess feel like a real princess! And thank you Michael for being such an amazing man, I am so happy to spend the rest of my life with you.